ZenMate Add to Chrome: A Comprehensive Guide to Secure Browsing
In today’s digital landscape, online privacy and security are paramount. With increasing concerns about data breaches, surveillance, and geo-restrictions, users are actively seeking solutions to protect their online activities. One such solution is ZenMate, a popular VPN (Virtual Private Network) extension for Google Chrome. This article provides a comprehensive guide on how to ZenMate add to Chrome, outlining its features, benefits, installation process, and usage tips to ensure a secure and unrestricted browsing experience.
What is ZenMate and Why Add it to Chrome?
ZenMate is a VPN service that encrypts your internet traffic and masks your IP address, providing a secure and private connection. By routing your connection through one of its global servers, ZenMate allows you to bypass geo-restrictions, access blocked content, and protect your personal data from prying eyes. Adding ZenMate add to Chrome is a straightforward process that brings numerous advantages to your browsing experience.
- Enhanced Security: Protect your data from hackers and snoopers by encrypting your internet traffic.
- Privacy Protection: Mask your IP address and browse anonymously, preventing websites and advertisers from tracking your online activities.
- Access Blocked Content: Bypass geo-restrictions and access websites, streaming services, and social media platforms that are blocked in your region.
- Safe Public Wi-Fi: Secure your connection when using public Wi-Fi hotspots, preventing unauthorized access to your data.
- Improved Speed: Some users report improved browsing speeds due to ZenMate’s optimized servers.
Step-by-Step Guide: How to ZenMate Add to Chrome
The process to ZenMate add to Chrome is simple and takes only a few minutes. Follow these steps:
Step 1: Open the Chrome Web Store
Launch your Google Chrome browser and navigate to the Chrome Web Store. You can easily find it by searching “Chrome Web Store” on Google or by typing “chrome.google.com/webstore” in the address bar.
Step 2: Search for ZenMate VPN
In the search bar located at the top left corner of the Chrome Web Store, type “ZenMate VPN” and press Enter. You should see the official ZenMate VPN extension listed in the search results.
Step 3: Add ZenMate to Chrome
Click on the ZenMate VPN extension to open its details page. Here, you’ll find information about the extension, including its features, reviews, and permissions. To ZenMate add to Chrome, click the “Add to Chrome” button located in the top right corner of the page.
Step 4: Confirm the Installation
A confirmation dialog box will appear, asking you to confirm the installation of the ZenMate VPN extension. This dialog box will also display the permissions that the extension requires. Review the permissions and click “Add extension” to proceed with the installation.
Step 5: Verify the Installation
Once the installation is complete, you’ll see a confirmation message indicating that ZenMate VPN has been added to Chrome. The ZenMate icon will also appear in the Chrome toolbar, typically located to the right of the address bar. This confirms that you have successfully ZenMate add to Chrome.
Step 6: Create an Account or Log In
Click on the ZenMate icon in the Chrome toolbar to open the extension’s interface. If you’re a new user, you’ll need to create an account. Follow the on-screen instructions to register for a free ZenMate account. If you already have an account, simply log in using your email address and password.
Configuring and Using ZenMate in Chrome
After successfully ZenMate add to Chrome and logging in, you can configure the extension to suit your needs. ZenMate offers a range of features and settings that allow you to customize your browsing experience.
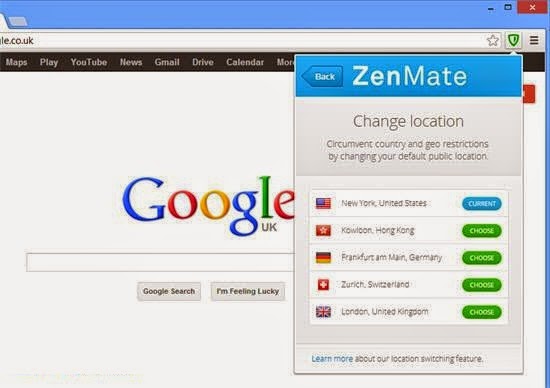
Choosing a Server Location
One of the key features of ZenMate is the ability to choose a server location. By connecting to a server in a different country, you can bypass geo-restrictions and access content that is not available in your region. To select a server location, click on the current server location displayed in the ZenMate interface and choose a different server from the list. ZenMate offers servers in numerous countries, allowing you to connect to various locations around the world.
Enabling and Disabling ZenMate
To enable ZenMate, simply click the large power button in the center of the extension’s interface. The button will turn green, indicating that ZenMate is active and your connection is protected. To disable ZenMate, click the power button again. The button will turn gray, indicating that ZenMate is inactive.
Whitelist Websites
ZenMate allows you to whitelist specific websites, meaning that ZenMate will be automatically disabled when you visit those websites. This can be useful for websites that require your real IP address or for websites that may not function correctly with a VPN enabled. To whitelist a website, navigate to the website and click on the ZenMate icon in the Chrome toolbar. Then, click the “Whitelist website” option.
Smart Locations
ZenMate also offers a Smart Locations feature, which automatically connects you to the optimal server location based on your browsing activity. This feature can help improve your browsing speed and provide a more seamless experience. To enable Smart Locations, navigate to the ZenMate settings and toggle the Smart Locations option on.
Troubleshooting Common Issues
While ZenMate add to Chrome is generally a smooth process, you may encounter some issues. Here are some common problems and their solutions:
- Connection Issues: If you’re experiencing connection issues, try switching to a different server location. You can also try restarting your browser or your computer.
- Slow Browsing Speed: If your browsing speed is slow, try connecting to a server that is closer to your actual location. You can also try disabling other browser extensions that may be interfering with ZenMate.
- Website Not Working: If a website is not working correctly with ZenMate enabled, try whitelisting the website or disabling ZenMate temporarily.
- Extension Not Installing: If you’re having trouble installing the extension, make sure that you have the latest version of Google Chrome installed. You can also try clearing your browser cache and cookies.
ZenMate Alternatives
While ZenMate is a popular choice for a Chrome VPN extension, there are several alternatives available that offer similar features and benefits. Some of the notable alternatives include:
- NordVPN: A well-known VPN service with a large network of servers and strong security features. [See also: NordVPN Chrome Extension Guide]
- ExpressVPN: A fast and reliable VPN service with a user-friendly interface and a wide range of server locations. [See also: ExpressVPN Chrome Setup]
- Surfshark: An affordable VPN service with unlimited device connections and a focus on privacy. [See also: Surfshark: Is It The Right VPN for You?]
- ProtonVPN: A secure and privacy-focused VPN service with a free plan and advanced security features. [See also: ProtonVPN vs Other VPNs]
Conclusion
ZenMate add to Chrome is a simple yet effective way to enhance your online security and privacy. By encrypting your internet traffic, masking your IP address, and allowing you to bypass geo-restrictions, ZenMate provides a secure and unrestricted browsing experience. Whether you’re concerned about data breaches, surveillance, or accessing blocked content, ZenMate offers a valuable solution. By following the steps outlined in this guide, you can easily ZenMate add to Chrome and start enjoying a safer and more private online experience.
Remember to always keep your VPN software updated and to be mindful of the websites you visit and the information you share online, even with a VPN enabled. A VPN is a powerful tool, but it’s just one piece of the puzzle when it comes to protecting your online security and privacy.
